Ocean Shores, WA

Ocean Shores, WA
my favorite place

Wednesday, July 25, 2012

Birthday Weekend at Buck Creek

 Birthday weekend camp-out at Buck Creek. Hubby Mark (left) and son Josh (right) share July 15th for their birthday and our friend Cylor's bd is the 14th. Josh requested Tacos and Won Ton's for dinner. We had a huge Pot Luck and then cake and ice cream for dessert, thank goodness we have a freezer in the trailer!
 After browning up 1 lb of pork sausage I added 1/2 cup diced Green Onion, 1 can of diced Water Chestnuts, 2 to 3 finely chopped cloves of Garlic and cooked for about 5 more minutes. For seasonings I add a few dashes of Soy Sauce, a dash of Salt, 1/8 tsp Black Pepper and 1 tsp Powdered Ginger. Mix all ingredients well and set aside. To prepare to make Won Tons you'll need a small bowl of water, 1 package of Won Ton skins - available in most produce depts at the grocery store and a clean smooth surface. Open the skins on 1 side, you don't want them to dry out. Place 2 to 6 skins out on surface, with finger dipped in water, rub 2 sides (making an "L" shape), add 1 Tbs of sausage mixture, fold skin over into a triangle, pressing the edges together.
 Place the filled Won Ton skins on a platter or baking sheet and cover with plastic wrap to keep from drying out. ***Don't use to much water or the skins will get soggy and stick together. Continue filling skins till mixture or skins are gone. If you have any leftover filling or skins you can freeze either to use at a later date. The skins are also great gust fried up and dipped in the Sweet and Sour Sauce (recipe to follow below) or cut up into strips and fry, drain on paper towel and use for Croutons.
 To cook, heat about 1/2 inch of cooking oil in a skillet, place the filled Won Tons in oil and "fry" until golden, turning once to get both sides, remove when done to a paper towel lined baking sheet - allowing any excess oil to drip out and place in a warm oven to keep warm or cover with tin foil.
 Look at all that golden goodness! YUM I can't wait to dig in. now to keep josh out of them till dinners ready!
 For the Sweet and Sour sauce I mix 2/3 cup Sugar, 6 Tbs Cider Vinegar, 4 to 5 Tbs Cornstarch, 1/4 cup Ketchup, a few drops of Red food coloring (optional), 1 Tbs Soy Sauce and 1 cup or more of cold water. With a wire whisk stir the ingredients well, getting out all the lumps.
Heat on med-hi, stirring constantly, as mixture comes to a boil it will thicken and color will become more red and no longer cloudy. If mixture is too thick just add more water a little at a time, whisking in after each addition. I always taste to see if I need more Vinegar or Sugar - guess it depends on my mood whether I'm feeling naughty or nice! LOL

Cool and Easy dinner salad

There's nothing better at the end of a long hot summer day than a nice cool and easy dinner.  One of our favs is a nice cool and crisp Shrimp Louie Salad. With a little forethought and ingredients from for fridge, freezer and pantry this is really an easy and quick to pull together dinner, plus the cleanup is easy too! Whenever we have a salad as a meal I like to add some type of bread to it, whether it's just buttered toast or my Obscene Bread recipe I just feel "I" need it to round out the meal.  I think this thought comes from my early years, mom and dad, Grandma and Grandpa always had bread with meals, maybe it's a farm thing? I got the recipe for Obscene bread many years ago from a co-worker. She said it was named so because it's so good it was "Obscene"! LOL.  My dear late Uncle Dan would agree with that statement, whenever I made this for a family function or a party he would eat a ton of it! Always warms my heart when someone loves something I have made so much! Now that he's passed whenever I make the bread I think of him and can picture him chowing down on this bread, makes me smile every time.

For some reason when using Shrimp  like to use Iceberg Lettuce, to me it just goes with the Shrimp better.  My Mom makes a Shrimp Salad with a mayo/lemon juice dressing and always uses Iceberg for that, so maybe that's where I get it?? The next time I make that Shrimp Salad I'll post the recipe. We always had this salad with steak and on holidays and I've made it for years for my family - the kids even liked it at very early ages.

I hope you try these recipes and enjoy them as much as my family and I have.
 I didn't think you needed to see how to chop lettuce or carrots so here's the final product pic first! Doesn't it look yummy??? For 2 servings you will need about 1/2 to 3/4 of a head of Iceberg lettuce cut/torn up. About 3/4 to 1 cup of shredded carrots, 2 to 3 green onions sliced thinly, 1/2 can sliced black olives, 3/4 to 1 lb salad shrimp, rinsed and picked free of any "extras" (IE: legs or shells) 2 hard boiled eggs - cooled, peeled, rinsed, quartered or chopped (I like to hard boil my eggs the day before or morning of) and the salad dressing (recipe follows below). Starting with lettuce layer ingredients on a dinner plates, top with dressing.
 For the dressing (which is really just a 1000 Island recipe) you will need about 1 cup Mayonnaise, 3 Tbs to 1/4 cup Ketchup, dash of Salt, 1/8 tsp Black Pepper, 1/4 tsp Garlic Powder, 2 Tbs sweet Pickle Relish and 3 dashes Tabasco or other hot sauce. Stir all ingredients together and keep refrigerated till ready to serve.  I like to mix up the dressing first and let it sit in the fridge while I put the salads together - gives it time to meld together a little!You may not wish to use the whole recipe for just 2 salads, it keeps great in the fridge for another salad or in a wrap with chicken and lettuce.
 Now for the BEST bread in the world! Well at least in my opinion!!!! For the OBSCENE Bread you will need a fresh loaf of French or Italian Bread, split lengthwise. To this you will "frost" each side with Mayo - amount depends on the size of the bread. Make sure to spread mayo out to the sides of the bread and be liberal, you want a good thick layer of the mayo. Next lightly sprinkle on some Garlic Powder and approx. 1/4 cup of Grated Parmesan cheese.
 Now add approx. 1/4 cup of sliced Green Onions - use the white and green parts, lightly press down into the mayo/cheese mixture - keeps them from rolling off!
Broil until golden and bubbly - slice and enjoy!  I have served this for so many occasion and it's always a hit. Great with salads or as a side dish.

Just typing this up is making me crave a Shrimp Louie and some hot bubbly Obscene bread!

I hope you try these recipes and enjoy them as much as my family and I have, and remember - it's all in a day! Enjoy, Tracy

Sunday, July 8, 2012

Quick Fix Talapia

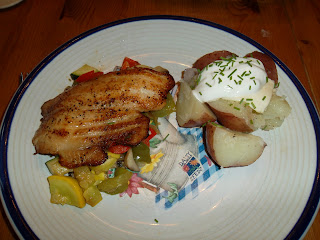
One of my favorite quick fix meals is sauteed veggies, steamed red potatoes and pan seared Talapia. I have found the best price for the Talapia at Wal Mart in their frozen fish cooler. Nice big fillets and I can get about 4 to 6 meals out of a bag for around $10 - now that's a bargain! My fav way to fix the fish is by sprinkling each side of the fillet with a little soy sauce, garlic powder, ginger, salt (very little) and pepper. I like to let the fillet sit and marinate for 20 minutes to an hour, I've even left it overnight in the fridge before and it was awesome! To cook the fillets, heat a little olive oil in a non stick fry pan and place the fillet in gently, cook for about 3 minutes on each side. Talapia is a very delicate fish and breaks easily, so be gentle when flipping it or removing it from the pan.

I like to have sauteed vegetables with my Talapia. For a starch my family likes steamed red potatoes but you could serve it with some rice or rice pilaf instead or even some buttered pasta.

Season the thawed Talapia fillets on each side with the soy sauce, garlic powder, powdered ginger, dash of salt and black pepper. Set aside to marinate while you cut up your veggies.
I like to use a combination of zucchini, yellow summer squash, mushrooms, sweet onion, red bell pepper and 3 or 4 minced cloves of garlic.
Saute the veggies in a few Tablespoons of Olive Oil till just tender and remove from the pan and keep warm.
Add a little more Olive Oil to the pan and then the Talapia fillets, gently turning after about 3 minutes.
I placed the cooked fillet on the veggies. I added steamed red potatoes that I quarted after washing and removing any bad spots. We like to put butter, a dollop of sour cream and some fresh snipped chives on top of the potatoes.

This is such a quick meal to fix and so light and delish! My kids like it, my hubby likes it - so it's an easy go-to meal for us - especially with the Talapia in the freezer ready to thaw!

I hope you try it and enjoy it!

Friday, July 6, 2012

I did wedding flowers for my friend Lorri's daughter Amanda last weekend. Amanda choose a color palette of white and shades of purples - really a nice combination for a wedding. She was so cute at our first consultation, we talked about what she liked, what colors she wanted, etc, she was very decisive.  Then a few days later she emailed me a bunch of pictures of bouquets she liked. I think she was afraid she had sent me too many, but it was just right, they all said the same thing and told me exactly what she wanted - really made my job easy. 

I took my daughter Kristin with me to deliver and set up. It was nice to have an artistic helper to decorate the staircase at the church with. Kristin certainly has her mother's eye for making sure everything is even and looks good. After we delivered the bride and her girls their bouquets at the Liberty Theater in Puyallup, we went next door to the Rose Restaurant for some breakfast, cute, quaint little place and great food - I highly recommend it!

I was really happy with the finished look of the flowers - I really loved the color combination. Amanda had asked for some jewels in the white roses of her bouquet. I found these awesome faceted jewel pins at the wholesaler that were just perfect - they really looked great in the lavender roses I used in her toss bouquet. The bride and her mom were happy with them as well. I must say I think Amanda was the calmest bride I've ever seen, she also looked beautiful as did her mom Lorri - gotta say it again Lorri I loved the hair! Wish mine had that much body!!! 

It was nice to do a wedding - something happy and festive. I've done too many funerals for dear people in my life this last year, so this was definitely a nice change. The funny thing was that the church scheduled a funeral in the morning before the wedding. Everyone coming for an early viewing thought I was decorating the stairway for the funeral - I had to keep clarifying that it was for a wedding later in the day. Apparently both events where done in the same colors, LOL.

In the beginning - buckets of flowers!
It's easier to make a grid with floral tape to help keep large arrangements in place.
                                     
                                          I'm old school I make a nice full greens base first.
                                     
 The end result of the 2 black vases - these are the 2 large altar pieces, after the ceremony they were moved to the reception and used as decoration there - great way to stretch your budget!
                                 The decorated staircase at the church. All the tulle and ribbon                              
                                              really helped soften up the concrete steps.
I love how these little "nosegays" turned out, so soft and fresh looking.
                                                   Mother and Grandmother's corsages
The Groom's Boutonniere
                            The Ringbearer's Boutonniere, I used a full bloom and a bud from white spray   
                       roses, the Ushers and Groomsmen, Dad's and Grandfather's all had a single white rose.
The Bridesmaid's Bouquets, beautiful and soft, love Amanda's choices of flowers and colors


 The Bride's toss bouquet. I used the jewel pins in the lavender roses for a touch of sparkle!
                                            

 And last but not the least - the bride's bouquet, soft and elegant just like her!
                                                                        
I hope you enjoy looking at the pictures of the flowers. Congrats to Amanda and Matt, may you have many, many happy and healthy years together.

Tuesday, July 3, 2012

Time for Fajita's


You'll need a medium sized yellow or sweet onion, 5 or 6 mushrooms, a red and green bell pepper and a few cloves of garlic
Saute the veggies in a little olive oil
Push the veggies to one side of the pan and add the sliced and marinated beef
  
When the beef looks just about cooked through add the chopped cilantro

Viola! Add some chips and salsa, a packaged Mexi rice and warm flour tortilla and dinners ready!


I was craving Mexican food the other day and picked up a nice thick top sirloin at the store. Brought it home and made up a marinade from a partial packet of Mesquite Marinade, a little bit of oil, water, 1/4 tsp of cumin, 1/2 tsp of garlic powder and some salt and pepper. I sliced up the beef steak and placed it and the marinade mixture in a ziplock bag and let it marinade for a few hours. I sliced up the meat before I cooked it - wish I would have just grilled it whole and then sliced it, it would have had a much better taste. To complete my "fajita" mixture, I sliced up 5 or 6 mushrooms, about 1 cup each of large diced red and green bell peppers, diced up 1 med onion, 3 cloves of garlic and 3 Tbspns Cilantro. To my heated pan I added about 3 Tbspns of olive oil, then added the onions, peppers, mushrooms and garlic. After the onions started to look translucent I then pushed the veggies to one side of the pan and added the sliced beef, stirring to cook on all surfaces - you may need to add a little more olive oil at this point. Continue cooking for about 3 or 4 minutes, then stir meat and veggies together and add the cilantro, cook for about 2 more minutes. If I had cooked the meat on the  BBQ grill and then sliced it, I would have just cooked the veggies in the pan and then served them with the meat on the side with warm flour tortillas.