Ocean Shores, WA

Ocean Shores, WA
my favorite place

Sunday, August 26, 2012

Ooooey Goooey Hot and Tasty Crab Dip

While I was shopping for groceries today I was trying to think of an easy treat for us that could serve as a hearty enough snack to tide us over till dinner.  After grocery shopping the last thing I wanted to do was to put groceries away and cook lunch. I looked around the store for ideas as I followed my list of must haves.  I wanted something decadent, I was on the hunt!  I came upon a pre-made Smoky Crab Dip, I thought that sounded good, maybe with some crackers or chips??? But then I saw the price - OUCH! it was almost $6.00 for this little 10 oz container - not happening in my world!

Ok time to re-group, let's think a bit and find something else. Then I remembered that "I" have 2 cans of Crab meat in my pantry! Viola! I could make my own for way less money and more for us to share - maybe some for the next day? LOL.

With this in mind I picked up a 8oz package of lite Cream Cheese (hey, I try to save calories where I can) and shredded Parmesan Cheese. I knew I had everything else I would need in my fridge and pantry. So I finished up my shopping and headed home, and YES after shopping and putting away groceries I had to cook our "lunch", LOL, but it was quick and relatively easy.

To make my Ooooey Goooey Hot Crab Dip I whisked together the 8 oz pkg of Cream Cheese and 1/4 Cup of Mayo till smooth. To this mixture I stirred in 1 Cup Shredded Parmesan Cheese, 3 chopped Green Onions - white and green parts, 1 Tbspn Garlic Powder, 1/2 tspn Old Bay Seasoning, 1/4 tspn Celery Salt, 1/8 tspn Liquid Smoke, 1/4 tspn Salt and 1/4 tspn Black Pepper. Fold in 1 8oz can Crab Meat, drained and picked through for any shells or cartilage.

Gathering of all the goodies! ** note I only used 1 can of the Crab meat.

Spread mixture in a 8 x 8 baking dish that has been sprayed with non-stick spray, sprinkle top lightly with Paprika.  Bake in 350 degree pre-heated over for 18 to 20 minutes or until bubbly and lightly browned. Serve warm with Corn Tortilla chips or Ritz crackers.


 Bake 18 to 20 minutes in a 350 degree oven, till lightly golden browned and bubbly
I dished us each up a little bowl and some chips, topped the dip off with some freshly snipped chives from my garden pot on my deck - LOL I always forget I have these growing, so I try t use them when I do, they add such a fresh taste.

Needless to say we enjoyed this dip, some of us all too well - no there's none left for tomorrow, :(.  I think next time I make it I may try adding some chopped Jalapenos and/or some chopped Spinach. I think either would be a nice flavor addition. I also think adding some salad size Shrimp or cut up Shrimp or even some of the Surimi (faux Shrimp or Crab) would work well too and add even more delicious seafood flavor --- YUUUUM!

Grandma's Carrot Salad

Sometimes do you just want a taste from your childhood? It's like your mouth is watering for something but you don't know what? This week while I was hastily scribbling out a weeks worth of dinner menus before trudging off to the grocery store, I needed a salad idea to go with a main dish idea. I was making Manwich's (yes I know, not really my typical gourmet grub) but I was tired of this can of sauce kicking around in my pantry - it had to go! I was tired of green salad, didn't want a pasta salad and then I remembered my Grama's Carrot Salad. I hadn't made it in a while, thought it would be great AND it served as veggie too! But in typical fashion of my tastebuds and culinary prowess I couldn't just make it as usual - although Grama, my mom and aunts always have made it the same way - and it was really good, being me, I just needed to kick-it-up a notch, bring it in to this culinary century!

I have made the basic recipe before and added drained crushed pineapple, my kids all like this version when they were little.  But even if I bought the smallest can of crushed pineapple I would still have half a can leftover because of the small amount I was making - and what do I do with that???  So I thought about how I could kick-it-up a bit and get a little more flavor into this little family favorite.

The following is the recipe that I came up with and much to my delight, it was quite tasty.
     To a 10 oz bag of matchstick shredded carrots (yes you can certainly shred your own), I added 1/2 Cup Raisins and 4 Tbsps chopped and toasted Pecans.  For the dressing I whisked together 1/2 Cup Mayo, 2 Tbsps Dark Brown Sugar, 2 Tbsps Honey, 1/8 tsp Cinnamon and 1/4 tsp Ground Ginger and a dash of Salt.  After whisking the dressing till smooth, pour it over the carrots, raisins and pecans and tossed well, then place it in the fridge to chill while preparing the rest of dinner.

 To toast the Pecans, after chopping, place in a dry pan and heat on med-hi, stirring occasionally, till slightly darkened and sweet smelling. Should only take a few minutes.
The finished salad, creamy, slightly sweet and tasty dressing, with crispy crunchy carrots and pecans and sweet raisins, just a homey, delicious salad for all ages to enjoy.

 To go with the Manwich's and Carrot Salad I decided to add some fried Potato Coins - haven't had anything deep fried in a while! To go with these we needed something to dip them in, but as I don't  like Ketchup, I thought I would make my version of  "Secret" sauce. My kids are hooked on this recipe - although I don't think they make it just like I do. My version is to 1/2 to 3/4 Cup of Mayo add 2 Tbsps or more Ketchup (it's ok mixed in stuff!), 1/2 tspn Garlic Powder, 1/8 tspn Salt, 1/8 tspn Black Pepper............................................................................................................................................
                  ........... and my SECRET ingredient - da da tadah - 1 tspn Horseradish.
                                        Whisk this all up and refrigerate until ready to serve.
 and the completed dinner, Manwich on a toasted bun, my kicked-up-to-date Carrot Salad, fried Potato coins and my Secret Sauce! I think it looks like a meal you could find in a dinner.

Sunday, August 19, 2012

I'm in Smoked Pork Loin Heaven!

Today was the day, the day for hubby Mark to smoke some pork! I picked up some pork loin on my last grocery run, through it in the freezer till I knew we had time to put into a good smokin'. Mark took it out to thaw yesterday morning and I mixed up the rub for him last night. He got the 2 chunks of loin coated real well with the rub, wrapped it up tight in cellophane and then put it in the fridge on a tray - just in case of any leaks, overnight to marinate.

After church this morning he started up his smoker - he's so funny, he's just been chompin' at the bit for weeks to smoke something. As the loin smoked, our whole house, yard and neighborhood filled with this wonderful sweet and smokey scent! I had run to the store to grab a few things and when I got back and opened my car door I was greeted with this wonderful aroma wafting through from the back yard - instant hungry!

Mark diligently watched over his treasure, keeping the temp at a constant 250 degrees for about 4.5 hours. He then proudly placed the smoked pork loin on a baking sheet and brought it in to rest. As I watched him hover over and around the meat I told him I wasn't in a hurry to eat. I felt bad for saying this as I saw the look of disappointment come over his face - clearly he was not happy with my announcement. He waited a few minutes until I was out of the room and then sliced off an end piece. When I came around the corner of the kitchen and surprised him, he quickly cut another piece and said, here you have to try this! I couldn't be mad, he was so happy with his accomplishment.  He was right, it was delicious, tender and moist with just the right amount of smoke and sauce on it.  I knew he wasn't going to last long at keeping out of it, so I figured I had better get the rest of dinner going.  I had already made a potato salad earlier but was planning on trying a new technique on some zucchini.

In my efforts to reduce some fat in our diet, I don't fry much anymore.  But I love fried zucchini, so I thought I would try a technique I saw on one of the cooking shows and see how it was.  I've tried a couple of different ways to make "oven-fried" things, but I haven't found one yet that I really like or have found to be even s slightly good candidate for the real thing. I have decided that's it's just better to abstain from the fried stuff on a regular basis and have it occasionally as a treat.

To do this new technique I saw, you trim the ends off the zucchini and then slice on the diagonal about 1/4 inch thick. I sprayed the cookie sheet with some cooking spray, then placed the "planks" of zucchini on the sheet.  I then sprayed the zucchini with "I Can't Believe It's Not Butter" spray - liberally. The sprinkle them with salt and pepper, garlic powder and then top with grated Parmesan Cheese.  I then baked them in a pre-heated 425 degree oven for about 15 minutes, till tender and tops are browned.
Aaaaawwww, the meat! Nicely coated with the rub I mixed up and let marinade in the fridge overnight tightly wrapped in cellophane.
The smoking has begun! 
  
 After smoking at a steady 250 degrees for about 4.5 hours, the meat has a beautiful smoke ring and fantastic flavor while still moist - it was so tender it cut easily with a fork. Those "Pro" smokers ain't got nuthin' on my hubby! LOL
 Look at that smoke ring - all I can say it YUUUUMMMMMY!
 Our complete meal with a dab of BBQ sauce.

The Pork Loin was absolutely delicious, the Potato salad as well.  The zucchini was OK, my daughter really liked it, I liked the flavor, but I think next time I'll cut it a little thicker, it was a little soggy for me, or maybe try broiling it the last few minutes to brown up the top.
 Here's the steps for the zucchini, wash the zucchini then trim both ends and slice on the diagonal into 1/4 inch thick planks.
 Place on a baking sheet that has been sprayed with some cooking spray, spray tops with some "I Can't Believe it's Not Butter" spray or some olive oil. Sprinkle with salt and pepper, garlic powder and then top with some grated Parmesan Cheese.  I baked mine at 425 degrees for about 15 minutes.
Nice and toasted brown and tasty! Plus lower in calories than fried - almost a good substitution.

Now the test will be to see how long the reminder of the Smoked Pork Loin last!

Saturday, August 18, 2012

Childhood memories

When I was a little girl my mom and grandma's were always trying recipes from the newspaper or magazines. Some were big hits with the family others not so much.  My family has always had a wide variety of menus items, even as kids we ate what the adults ate, whether it was steak, shrimp or a bologna sandwich. But as we were a family of 7, my mom was always very frugal and wise with her grocery budget. She was always on the hunt for a great recipe, that was tasty and thrifty, although we were the ginea pigs for these new adventures in epicurean delights, the recipe had to pass by us 5 kids and dad!  She once was so excited about a recipe called "Terrific Turbot", she thought AHA, another way to get the kids to eat more fish. After she diligently followed the recipe, proudly placed it on the table and dished up our plates, we all took a couple of bites and renamed the recipe "Terrible Turbot" - this recipe was never repeated at our table again. But there were many other recipes that were absolutely delicious and Mom continues to still make today.

One of my favorites is one that I remember Mom calling "Coney Dogs". Now myself never really being a fan of hot dogs or Corn Dogs, I was not looking forward to this new idea.  But it actually has become one of my favorite ways to eat a hot dog - I only have 2 ways! 1) is roasted on the campfire and 2) this recipe, which I have adapted to make it really quick and easy. I keep forgetting to ask my mom if she made her own BBQ sauce or used a bottled brand, I just adapted the recipe to a quicker and easier way (for me) so many years ago that I just always do it this way. I hope you try this recipe and enjoy it.
 For MY version of my Mom's Coney Dogs you will need, 1/2 of a medium onion sliced and 2 cloves of Garlic minced.
 In a medium saute pan put 2 T Oil, let it heat slightly, swishing it around to coat the bottom of the pan, add the sliced onions and saute until they start to become translucent. Add the minced garlic and continue cooking while stirring occasionally, you don't want to burn the garlic, for about another 2 minutes.
 Prepare the hot dogs by doing a partial slice 2 to 3 on each dog. I used the longer "bun" length dogs and 3 slices was just right.
 Add the prepared hot dogs to the saute pan and cook to just brown a little, being careful not to break them up. I don't really know why the original recipe said to put the slices in them, I would think to maybe impart a little more of the BBQ sauce flavor into the meat or maybe just to make them look more interesting?

 After the dogs have browned up a bit, add your favorite BBQ sauce. Your own recipe or favorite bottled brand works great, we happen to love Sweet Baby Ray's original sauce, so that's what I used.
 Next add about 3/4 of a cup of water, gently stirring it in, again being careful not to break up the dogs. Reduce the temp to simmer and cover.  Let the dogs cook in the sauce for at least 15 to 20 minutes, you may need to stir in a little more water if sauce reduces to much..
While the dogs are simmering in the BBQ sauce, open up enough hot dog buns and toast under the broiler.  When the dogs are ready spread the toasted buns with some of the sauce and onion/garlic mixture, then place the dog on the bun and serve! I like to mix up some coleslaw to go with the Coney Dogs but you could serve just about any side dish or salad with them.

Monday, August 13, 2012

I scored at the grocery store!

Being price conscious when buying groceries, I found a real bargain the other day. I was looking for pork chops and spied the baby back ribs, then I saw the price, ouch! But then I saw these bags of "Riblets" It was just a big bag of pork! I asked the meat cutter what the difference was, he said it's the same thing as the "Riblet's" that they lay out all nice and pretty on the trays and charge twice as much for to cover the labor. SCORE! I bought a bag (only paid $1.68 a lb) and proudly dragged them home to show off to the hubby - I knew his mouth would water!!! Oh I did buy some thin sliced pork loin chops in the family pack, for about $8 I had enough meat for 2 meals for 4 people. I grabbed some boxed cornbread stuffing mix to go with, I've been craving pork chops and stuffing for a while - not really "hot" weather food, but oh so tasty.

All though I did pick up some BBQ sauce I knew I would also do a dry rub/marinade on these delicious looking little Riblets - after all I have been watching the BBQ competition shows! So off to the Spice cupboard I went! I made a mixture of about 1 1/4 Cups Dark Brown Sugar, 1 T Garlic Powder, 1/2 tsp Black Pepper, 1 T Cayenne Pepper (it was a bit spicy, so use less if you wish), 1 tsp ground Coriander, 1 tsp Celery Salt and 1/2 tsp of Sea Salt. Mixed these ingredients up well and sprinkled on both sides of the rinsed Riblets that been placed on a foil lined large baking sheet. I then covered the Riblets with more foil and placed then into the fridge to "marinate" for a few hours - can do this overnight as well.

After letting the Riblets marinate for about 4 hours and having the coals ready on the little red BBQ, the grilling was on! Hubby Mark is so funny, give him some meat to grill or smoke and he is one happy camper! Mark grilled the Riblets to perfection, he did some with just the dry rub on them and the others he added some bottled Sweet BBQ sauce - which combined with the spiciness of the Cayenne in the dry rub was perfect! Really had that Sweet/Hot combo going on.

 I think we needed a bigger grill for these! But hey you use what you got!
 Someone dumped this like-new little red grill off in our alley behind our house. The legs were messed up, so after cleaning it really good Mark is explaining to me how easily he fixed it. Just another one of his treasures!
 With some of our favorite bottle BBQ Sauce, nice and shiny - ooey & gooey! I can't wait to dig in.
This one is grilled with just the dry rub on it, still delish! - just not as messy!!!
 
While Mark was doing the grilling, I steamed up some cauliflower we had, made up some fresh cheese sauce and cut up a cantaloupe. Wasn't the prettiest plate - pretty much orange and brown, but the combination of flavors was fantastic! The Sweet/Hot of the Riblets was perfectly contrasted by the sweet cool melon and the cauliflower and cheese sauce just hit that "homey" spot of a good home cooked meal.  Other than the marinade time for the Riblets the whole meal only took about 30 minutes to cook, so really with a little pre-prep efforts this was a quick dinner to make on a hot day.

 To make the Cheese Sauce you will need: 2 T Butter or Margarine, 1/4 tsp Black Pepper, a slight 1/2 tsp Salt, 1/4 tsp garlic powder, 3 to 4 T flour, 1 1/2 Cups Milk and 1 C Shredded Cheese. I used a Cheddar/Jack mix because that's what I had, but use what you have, full cheddar give much more flavor and color.. Using Pepper Jack makes a great hot dip for chips!
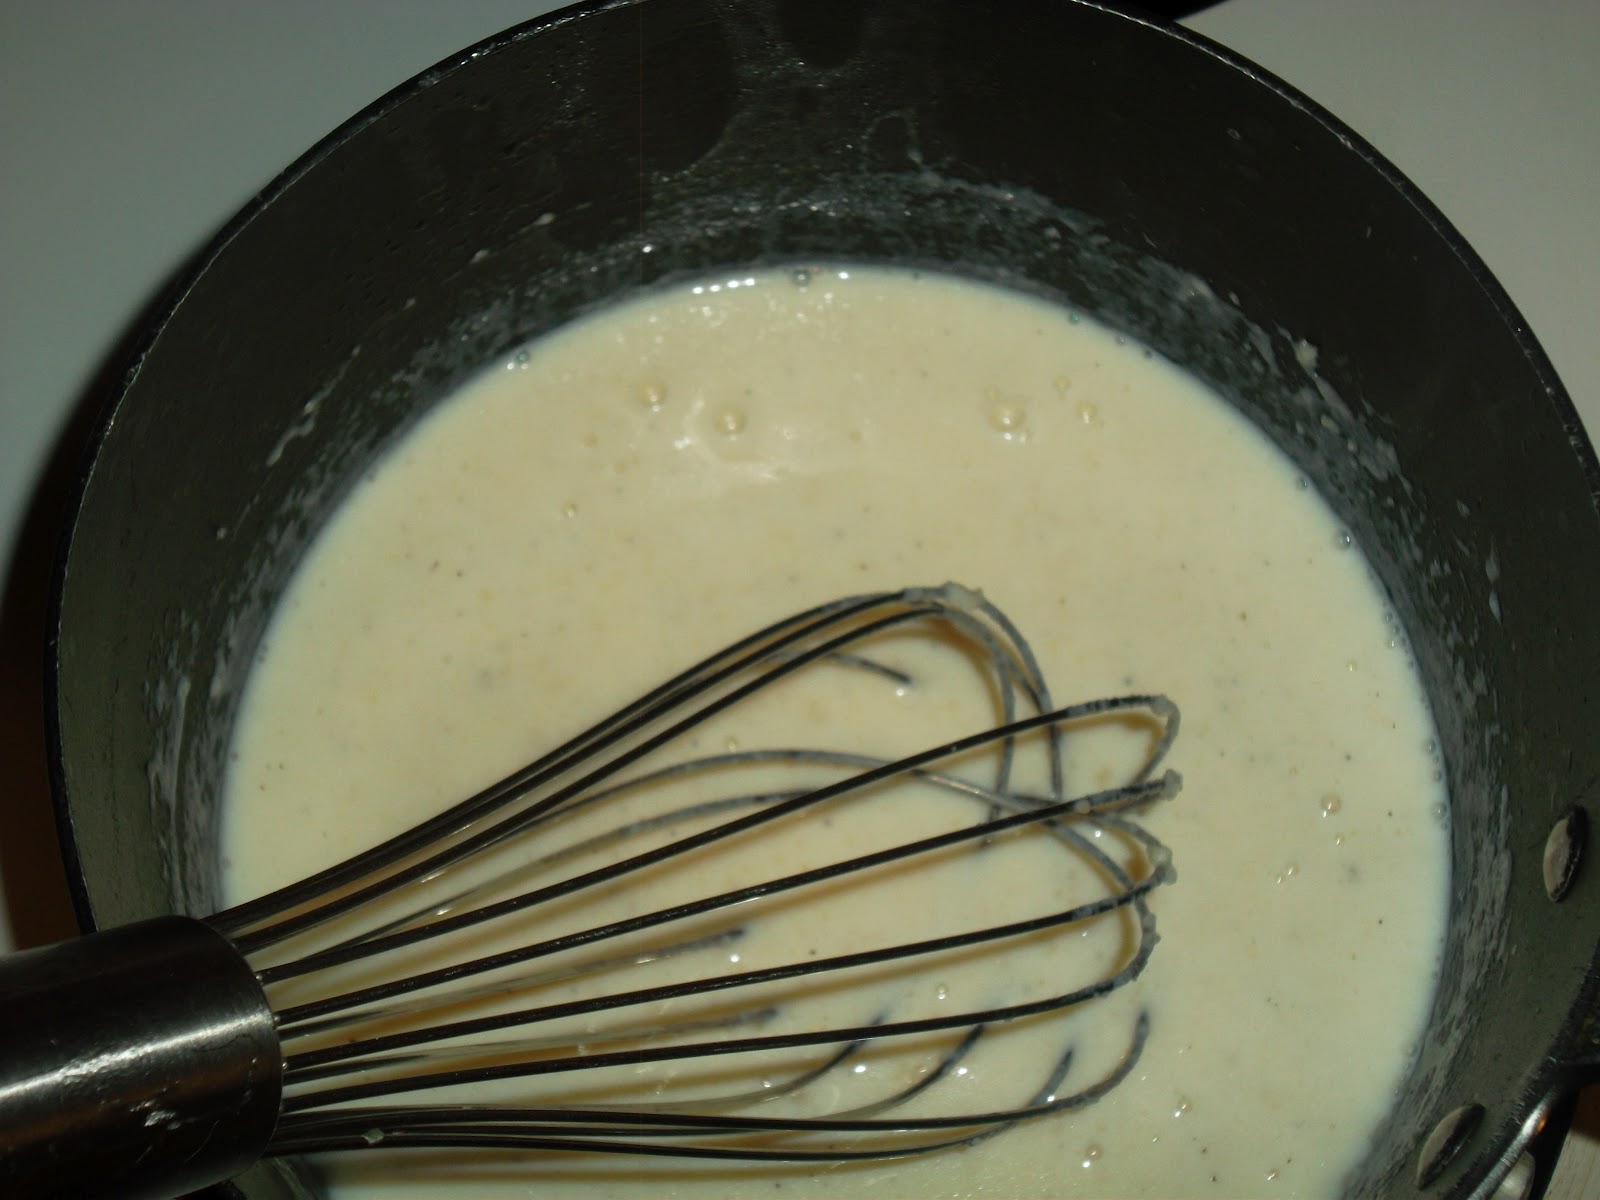
 Melt the Butter or Marg in a sauce pan, add the flour and stir in well
 Continue stirring constantly to "cook" the raw taste out of the flour, if the mixture is to liquid add a little more flour. Add the remaining dry ingredient and stir in well.
 Once you have continued to stir and cook this flour/butter mixture for about 2 minutes add the milk about 1/2 at a time and stir well to blend out all lumps, add the remaining milk and stir well until all lumps are out. If mixture is to thick add a little more milk until the sauce is the desired consistency you like. I tend to make my sauces and gravies on the thicker side - just a personal preference thing.
 Once you have the sauce as you like it, add the shredded cheese and stir well. The melted cheese will tighten up the sauce a bit.
 The sauce is done and ready to be poured directly onto your vegetable or into a gravy boat or bowl for individual serving. If I'm making cheese sauce for Asparagus I like to add a a 1 to 2 tsps of Mustard, I just like the added flavor of the mustard with the Asparagus.
 Before adding the sauce to your veggies, make sure you have drained them well, even though I steam most of my vegetables, many like broccoli and cauliflower will hold a lot of water in them, so they really need to be drained well.
YUM, time for some good old home cooked comfort food!