Ocean Shores, WA

my favorite place
Friday, February 28, 2014
Nothing new to share today other than I am in the process of updating my blog and updating my skills so that I can! LOL
Being not so techy I am having a difficult time navigating some of the things I want to change and upgrade. I was so excited to put my new tablet I got for Christmas to use. But I am finding that it does not want to sink up to my blog when I try to upload pics have taken with it :(. So it's back to the old laptop - wow it feels so prehistoric!
So stay tuned for some great upcoming "Spring" themed blog post coming up soon. I have a combination of recipes and crafts to share for use in Easter and Mother's Day!
Till further notice keep creating!
Talk to you soon,
Tracy
Thursday, December 19, 2013
Quick and Easy Peasy Pie Crust
Ok I'll admit it I suck at making pie crust, mine always turn out tough - probably because I roll the heck out of them??? My family has been using this recipe for as long as I can remember - although my mom makes wonderful pie crust, apparently I didn't get that gene!
The recipe is called Pat-a-pie crust. I love this recipe so much that I really haven't even bothered to try and improve on my "traditional" pie crust making. This crust recipe works for any kind of pie, you can bake it off for a fruit or pudding filled pie or use when making a filled pie. I especially love this recipe used with a fresh strawberry pie, there's just something about it the flavor combinations that I just love. I also use this crust for quiche, as it is slightly salty (you can adjust the salt a bit) it's perfect for savory dishes as well as desserts.
 This recipe is really so simple! In a pie pan mix together 1 & 1/2 cups all purpose flour, 1 & 1/2 teaspoon sugar and 1 teaspoon salt.
 In a measuring cup mix 1/2 cup oil (I use Canola) and 2 tablespoons milk, mix well.
 Pour the oil/milk mixture into the pie pan with the dry ingredients.
 Mix until all ingredients are incorporated.
 Once all ingredients are mixed well, pat out the crust mixture in the pie and up the side for a beautiful crust. I do the "finger & thumb" pinch but you can do any finish you like for the top edges. If you're going to bake the crust off before filling it make sure you use a fork and poke a few holes in the bottom to allow for steam.
 When baking a long baking pie like apple, pumpkin or pecan to keep the crust from over browning use a crust shield or do what I do and fold 3 narrow strips of tin foil together and place around the crust folding the extra over the top.
 Try this crust recipe out you like me may never go back to using a traditional crust recipe or those refrigerated ones again!
Enjoy and remember to be creative and have fun!
Try this crust recipe out you like me may never go back to using a traditional crust recipe or those refrigerated ones again!
Enjoy and remember to be creative and have fun!
Monday, December 16, 2013
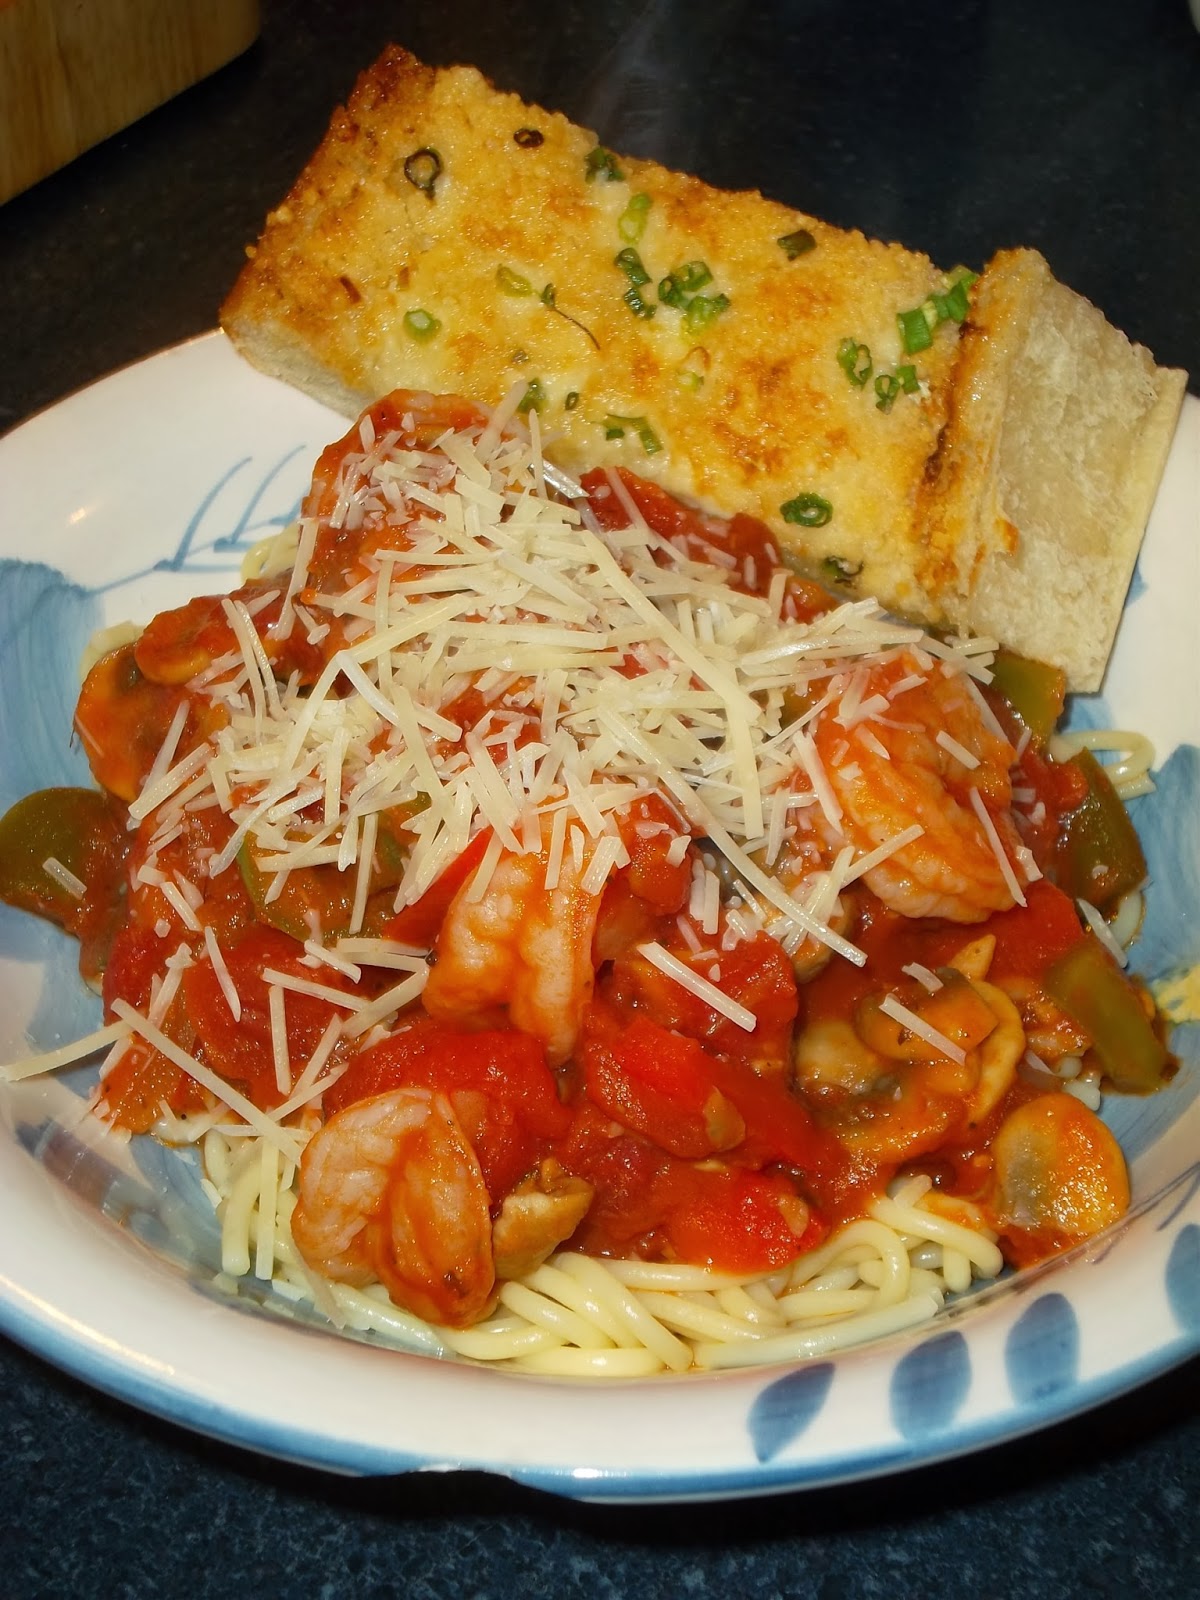
Day 5 - Quick and easy dinner for this busy holiday season or anytime.
I love Chicken Cacciatore but I don't always want to go to the long process of making it. This is my recipe for a quicker Seafood Cacciatore that my family loves and is something just a little different from another chicken dish. Now don't get me wrong I can eat chicken just about every day of the week and be fine with it - it's so versatile, but my hubby likes a little beef or something different once in awhile. Which is kind of how I started making this version with shrimp, and it goes really well with my Obscene Bread that I posted about on my last post.
 For this recipe you will need just a few ingredients, to serve 4 to 6 people (I like to have some for leftovers for lunch) 1 lb of raw, deveined shrimp (whatever size you like, I tend to use 26/30 for recipes like this - to make this an even faster recipe you could use already cooked shrimp - I prefer raw), 1 red bell pepper, 1 green bell pepper, 1 small onion, 1 & 1/2 cups sliced mushrooms (optional), 2 to 3 large cloves of garlic, 2-15 oz cans of diced Stewed Tomatoes with garlic and Oregano, 1 small can of Tomato Paste, 1/2 tablespoon of Italian Seasoning, 3 tablespoons of olive oil, 2 tablespoons of butter, salt and pepper to taste.
 I think part of getting a meal on the table quickly is getting everything prepped, so you do not have to keep stopping to do some chopping or other task. You will need to rinse and peel the shrimp, dice the peppers, slice the onion into slivers, chop the garlic and slice the mushrooms if using. These steps can even be done the night before and covered tightly and placed in the fridge for a quick cook after work.
 Here's a tip to cut up a pepper easily with no scooping of seeds! Just stand it on end and slice off into 4 sides leaving a "core", you can then also trim the bottom off and use it too. I then slice it into strips and cut to the desired size for my recipe.
 Over med-high heat start heating your pan or skillet - I like to use my deep sided fry pan so I have room to stir, add the oil and the butter, and let the butter melt into the oil - give it a swirl a few times to keep it from burning.
 .
Next everybody into the pot! I do put my onions in first for a minute or so and let them start to get translucent then I add my peppers, mushrooms and the garlic last. Give everything a good stir to mix up. Another tip is to try to cut everything about the same size, it'll cook more evenly.
.
Next everybody into the pot! I do put my onions in first for a minute or so and let them start to get translucent then I add my peppers, mushrooms and the garlic last. Give everything a good stir to mix up. Another tip is to try to cut everything about the same size, it'll cook more evenly.
 Let the veggies cook for a few minutes (stirring occasionally), while they're cooking open up the 2 cans of diced Italian Style Stewed Tomatoes and the can of Tomato Paste.
 Pour the diced Tomatoes into the pan and then the Tomato Paste and stir, if sauce is too thick add a little water - if serving pasta with this dish a little pasta water works great.
 After the veggies and sauce have cooked together for a few minutes add in your rinsed, shelled and deveined shrimp. Give the dish a good stir to get everything incorporated and let cook - stirring occasionally until the shrimp are pink (LOL, I know it's in red sauce) but about 5 to 7 minutes.
 I like to serve this over Linguini or thin Spaghetti but it would be good over rice as well. And as I stated at the beginning my Obscene bread goes great with this dish or you could do garlic bread or toast. But you'll definitely want some type of bread to sop up the sauce - oh soooo good! I also like to top it with a little shredded Parmesan cheese.
This is such an easy meal to make and fairly light on calories too. Plus it heats up well for leftovers. I took some to work the next day - with some Obscene Bread of course and everyone in the lunchroom wanted to know what I had that smelled so good!
This is the season for Turkey and other heavy meals, if you're looking for something different and lighter give this recipe a try. You can change up the veggies too - I have used zucchini in this recipe too and it was wonderful! it's such a great way to get some seafood into your diet!
Enjoy and let me know what you think!
I like to serve this over Linguini or thin Spaghetti but it would be good over rice as well. And as I stated at the beginning my Obscene bread goes great with this dish or you could do garlic bread or toast. But you'll definitely want some type of bread to sop up the sauce - oh soooo good! I also like to top it with a little shredded Parmesan cheese.
This is such an easy meal to make and fairly light on calories too. Plus it heats up well for leftovers. I took some to work the next day - with some Obscene Bread of course and everyone in the lunchroom wanted to know what I had that smelled so good!
This is the season for Turkey and other heavy meals, if you're looking for something different and lighter give this recipe a try. You can change up the veggies too - I have used zucchini in this recipe too and it was wonderful! it's such a great way to get some seafood into your diet!
Enjoy and let me know what you think!
Sunday, December 15, 2013
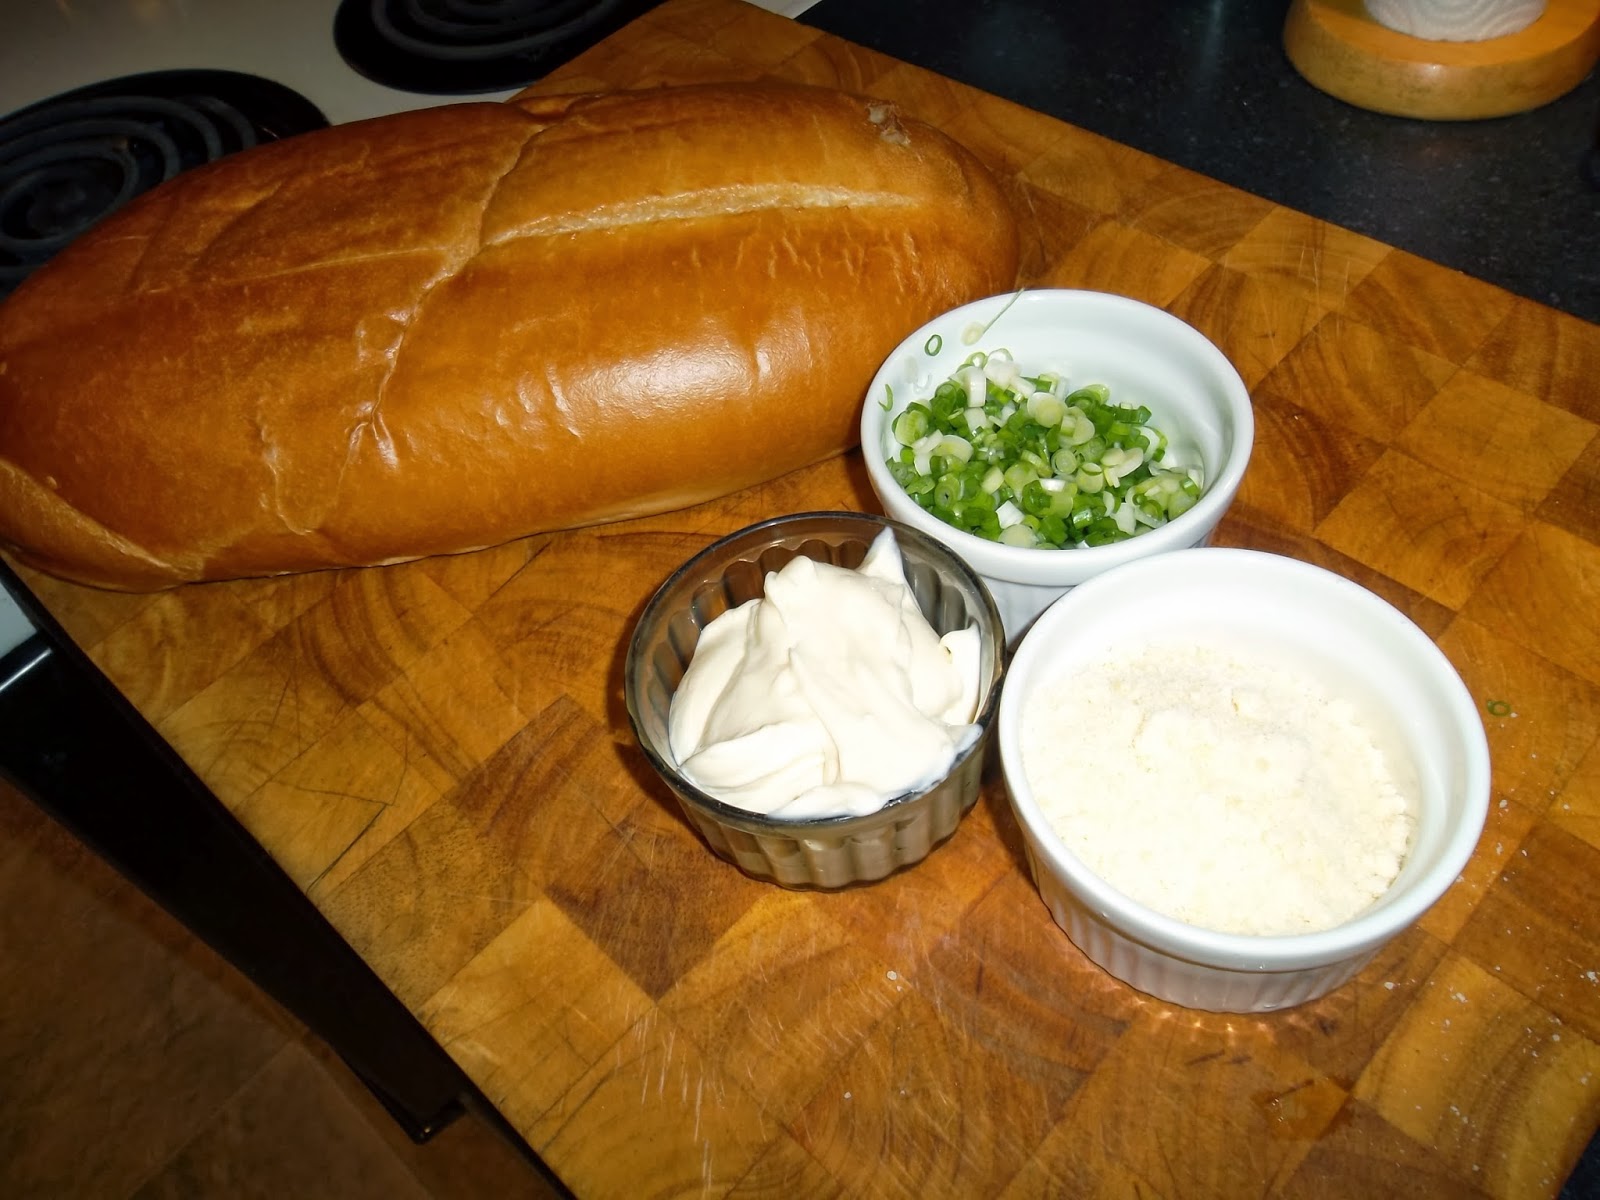
Day 4 THE BEST side dish or appetiser for the busy holiday season - Obscene Bread - it's so good it's OBSCENE!
About 30 years ago I was working in an office with 15 other women. We had the best potluck lunches and treats. Somebody was always bringing in something tasty to share and we could find any reason to have a potluck - birthdays, baby showers, promotions, etc. About the only thing we didn't do a potluck for was end of the month closing and that's because our boss always made us a deal if we closed on time he would take us all out to lunch. Great deal for us - not so much for him, but he enjoyed lunch as much as we all did, after all he was surrounded by 16 beautiful women!
This recipe for Obscene Bread comes from one of the gals I used to work with. It's so simple and delicious it really deserves it's name of Obscene Bread - after all it's so good it's obscene! LOL!!! I have been making this for any potluck or gathering I go to. People just love it! My late Uncle Dan would see it on the table at one of my parties and immediately go for it and then keep telling me how much he loved it. Isn't it great when a simple recipe has such a great response from people? My hubby went to a friends the other day and I suggested he take the leftovers with him, his friend Erik told next time to bring him a whole loaf!
Like I said this recipe is so simple and I have posted it here on my blog before - but it is one that deserves repeating and especially for the holiday season. It's delicious, easy and extremely low cost AND it's something different that many people have not had - everyone will be begging you for the recipe!
To make the Obscene Bread you will need:
1 loaf of French or Italian style bread,
roughly about 1/2 to 3/4 cup of Mayonaise,
1/2 to 3/4 cup of Grated Parmesan cheese and
3/4 to 1 cup sliced green onions, depending on how much onion you want - both the white and green parts
 Slice the loaf of bread horizontally, place on a baking sheet
 Spread the mayo on each side about 1/8 inch thick - covering all the way to the sides - you want a good covering so the other toppings kind of melt into it
 Sprinkle both sides evenly with the Parmesan cheese first and then the sliced green onion
 Now place in the oven and broil on HIGH until the toppings are lightly browned and bubbly. Remove from oven and carefully (it's hot) slice into desired size of pieces. Serve immediately, truly best when fresh from the broiler but not bad at room temp either - which makes it great for entertaining.
 I hope you too enjoy this as much as my family and friends do, please feel free to leave me a comment on what you thought.
Happy Holidays from me Tracy aka: It's All In A Day @ imburningdaylight@blogspot.com
I hope you too enjoy this as much as my family and friends do, please feel free to leave me a comment on what you thought.
Happy Holidays from me Tracy aka: It's All In A Day @ imburningdaylight@blogspot.com
Wednesday, December 11, 2013
On the 3rd day of Christmas you have to make these delicious Sugar Cookies!!!
Ok I know everybody has their favorite Sugar Cookie recipe and I actually have a couple and want another that I'm trying to get from my Aunt Mary for my Grandma's Sour Cream Sugar Cookies - but we'll save that for another post! LOL.
I love making the traditional mix up, refrigerate, roll out, cut out, bake and then spend hours decorating and yes I do make them when I have time. BUT do you need a delicious Sugar Cookie that's quick, easy and as one of my co-workers stated taste like it came from Heaven??? Then this is the recipe you need to use - whether you're in a hurry or not!
The cookies are called Sue's Marvelous Sugar Cookies, I got this recipe from my Aunt Lois that got it from her friend Sue - hint that's why they're called Sue's Marvelous Sugar Cookies LOL. These really are an easy cookie to make, fairly quick and yes they are delicious. They're light and crisp and soooo good with warm or cold beverages - great cookies for Santa!
To make this recipe you will need:
1 Cup Canola Oil, 1 cup Butter at room temp (or Butter Flavored Crisco),
1 Cup Granulated Sugar plus 1/2 cup - divided, 1 Cup Powdered Sugar,
2 Eggs, 1 teaspoon Baking Soda,
1 teaspoon Cream of Tartar, 1 teaspoon of Vanilla - use the real Vanilla, it's worth a little
bit more expense and
4 & 1/2 Cups All Purpose Flour
 Step 1 -- With a mixer or in a stand mixer, cream oil, butter (or Crisco) and sugars - make sure to scrap the sides and bottom about half way through so all is combined.

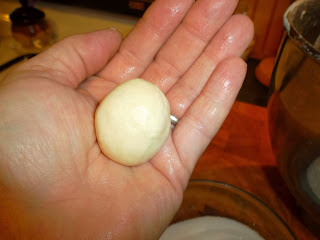 Step 2 -- Roll about 1/2 Tablespoon of dough into a ball and dip top into granulated sugar, place balls onto a parchment lined baking sheet, continue this process till sheet is full.
 Step 3 -- Now with a flat bottomed glass or a cookie press or a glass with a design on the bottom such as I have (I love the design on the bottom of these glasses - I've had them for years, don't really even drink out of them but I keep them for backup and to make these cookies! LOL) slightly press the balls down to flatten them - leaving the dough ball about 1/4 inch thick or slightly a little more, you may need to dip the bottom of the glass in the granulated sugar to keep it from sticking to the dough. Again repeat this process until all are flattened. I like to sprinkle a little extra sugar on the tops, you could also use the colored decorator sugars for a more colorful festive look or maybe flatten with a smooth bottomed glass and sprinkle with some of the chunky sugars that are available now - so many options!
Step 4 -- Place in a pre-heated 350 F degree oven and bake for approximately 11 minutes. I always start checking for doneness a minute or 2 before the suggested time - just to make sure where and how my oven is cooking or how accurate it is compared to the recipe I'm trying. Bake until the edges are just starting to show lightly browned.
Step 5 -- When cookies are done remove from oven and using a thin spatula remove from the pan to a cooling rack or another sheet of parchment paper to cool.
Step 3 -- Now with a flat bottomed glass or a cookie press or a glass with a design on the bottom such as I have (I love the design on the bottom of these glasses - I've had them for years, don't really even drink out of them but I keep them for backup and to make these cookies! LOL) slightly press the balls down to flatten them - leaving the dough ball about 1/4 inch thick or slightly a little more, you may need to dip the bottom of the glass in the granulated sugar to keep it from sticking to the dough. Again repeat this process until all are flattened. I like to sprinkle a little extra sugar on the tops, you could also use the colored decorator sugars for a more colorful festive look or maybe flatten with a smooth bottomed glass and sprinkle with some of the chunky sugars that are available now - so many options!
Step 4 -- Place in a pre-heated 350 F degree oven and bake for approximately 11 minutes. I always start checking for doneness a minute or 2 before the suggested time - just to make sure where and how my oven is cooking or how accurate it is compared to the recipe I'm trying. Bake until the edges are just starting to show lightly browned.
Step 5 -- When cookies are done remove from oven and using a thin spatula remove from the pan to a cooling rack or another sheet of parchment paper to cool.
 ***TIP I actually save my "cooling" parchment papers and reuse them many times, I just fold them up or roll them and tuck away in my baking cabinet. I don't reuse the ones I bake on though, they get slightly brown and crispy by the time I'm done baking a batch of cookies so I toss them.
This recipe also does well for packing up too - whether in a container or in a cookie bag. I have used clear cello to roll them up in and then folded the bottom like a gift package and taped it shut, used a twist tie to securely close and then a pretty ribbon to tie off the top for a festive gift or to add to a gift basket. Believe me use this recipe to tuck in with a selection of coffee, cocoas or teas and the receiver will ask for more cookies!
I sure hope you take time and try these cookies out, in fact I think I'll go fix a cup of hot Eggnog and have a couple of cookies now! Enjoy and again thanks for stopping by It's All In A Day at imburningdaylight@blogspot.com
Take care and be creative! Tracy
***TIP I actually save my "cooling" parchment papers and reuse them many times, I just fold them up or roll them and tuck away in my baking cabinet. I don't reuse the ones I bake on though, they get slightly brown and crispy by the time I'm done baking a batch of cookies so I toss them.
This recipe also does well for packing up too - whether in a container or in a cookie bag. I have used clear cello to roll them up in and then folded the bottom like a gift package and taped it shut, used a twist tie to securely close and then a pretty ribbon to tie off the top for a festive gift or to add to a gift basket. Believe me use this recipe to tuck in with a selection of coffee, cocoas or teas and the receiver will ask for more cookies!
I sure hope you take time and try these cookies out, in fact I think I'll go fix a cup of hot Eggnog and have a couple of cookies now! Enjoy and again thanks for stopping by It's All In A Day at imburningdaylight@blogspot.com
Take care and be creative! Tracy
Friday, December 6, 2013
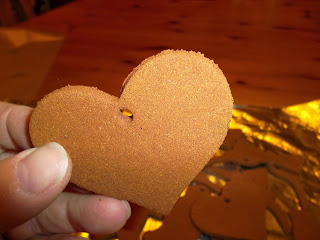
AND on the 2nd day of Christmas I crafted some of these....
Tis the season to be crafting, fa la la la la la la la and the crafting has begun! Here's an easy, low cost, low
ingredient and wonderful smelling Christmas ornament that's as easy to make as it is great smelling!
I first made these Cinnamon ornaments years ago and I have made them several times since. I've sold them at craft shows, tucked them in baskets of Pinecones around the house (their cinnamon scent last quite a while) and given them away as gifts. This design has a natural kind of "Rustic" look to them and would lend themselves to any shape of cookie cutter. A moose or bear design would look great in a "lodge" themed Christmas design.
To make these wonderful smelling Christmas ornaments you will need:
about 3/4 of a Cup of Ground Cinnamon
1/4 to 1/3 cup of plain Applesauce
a medium sized mixing bowl, wooden spoon, rolling pin, cookie cutters of your choice, thin spatula, baking sheet, a drinking straw, ribbon or raffia and white paint, glitter paint or snow writer paint.
 In the medium mixing bowl combine 1/2 cup of the Cinnamon and 1/4 cup of Applesauce to start with,
 stir to mix well. If mixture is too dry add more applesauce - if to wet add more cinnamon -- a little at a time of either, stirring well after each or any additions.
 Continue stirring until a ball of dough forms. Sprinkle additional Cinnamon onto a cutting board or counter and then knead ball of dough several times, adding more cinnamon as needed till dough ball is no longer sticky.
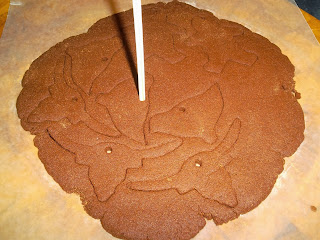
 Next using a rolling pin, roll out dough to about 1/4 inch thickness. You may need to sprinkle a little more cinnamon on to keep the dough from sticking to the surface or the rolling pin.
 Once rolled out to the desired thickness it's time to start cutting out your chosen shapes! I love the metal cookie cutters, their thin cutting surface really makes getting nice crisp edges easy but any style would work - use what you have. As the Applesauce does have some fiber to it, you want to make sure you press the cookie cutter down firmly and evenly.
 Before moving the cut outs to a baking sheet you'll want to use the drinking straw to punch a hole for the ribbon or raffia to be tied through. **TIP -- I out of habit usually blow out the little piece that gets stuck in the straw, I just blow it back onto the excess dough and mix it back into the ball.
 Using a thin spatula or knife lift the cut shape off the board and transfer to a foil lined baking sheet.
 Now that all shapes have been cut out, hanger holes punched and they've been placed on the foil lined baking sheet it's time to bake them off! Actually you're really doing more of a drying than baking. You're going to place the baking sheet of cutouts into a pre-heated 200 degree F oven for about 2 hours. They really won't get browned but if you gently pick one up you can see that the outer edges are becoming dried and the center area looks moist. They will continue to dry a bit more as they cool down. When I remove them from the oven I leave them on the baking sheet to cool down. If you had a dehydrator you could use it to dry them instead of the oven. But then your house wouldn't smell as wonderful! As the cut outs bake-off in the oven, the oils of the cinnamon heat up and the scent of the cinnamon permeates your home making it smell soooo wonderful.

 After the cut outs have cooled completely, you may need to "sand" the edges a bit - if you want a smoother finish. To do this simply use a piece of sand paper or a nail file -- nail files work awesome! Their straight edge make it easy to get into any corners your cut out design may have and if you have any arthritis or hand issues I think the file is easier to grip.
 Once all of the cut outs have had their edges filed it's time to decorate them!!!
 For this batch I chose a Snow Glitter writer that I had. It has a nice writing tip on it but it was more translucent than I really preferred.
 Last time I made the cut outs I used a white paint pen, it was much more opaque but not sparkly enough so on the snowflakes I added some glue and sprinkled it with a fine glitter. They almost had a flocked look to them, they were very pretty hanging on a tree.


 But for this time I just simply wrote a message did simple dots or an outline and let the glitter paint dry.
 Once the paint has completely dried it's time to put some ribbon or raffia, yarn or whatever you choose on to help them hang from your tree, packages or garland or whatever you're going to do with them. If you don't plan on hanging them then don't use the straw to put a hole in them.
Now see wasn't that a simple project??? And oh the wonderful scent that it leaves your house in just wonderful. I hope you give these simple ornaments a try and let me know what you think.
Happy Holidays, Tracy
Once the paint has completely dried it's time to put some ribbon or raffia, yarn or whatever you choose on to help them hang from your tree, packages or garland or whatever you're going to do with them. If you don't plan on hanging them then don't use the straw to put a hole in them.
Now see wasn't that a simple project??? And oh the wonderful scent that it leaves your house in just wonderful. I hope you give these simple ornaments a try and let me know what you think.
Happy Holidays, Tracy


Tuesday, December 3, 2013
Part 1 of "12 days of great recipes and easy craft projects" Raspberry Cookie Bars
Awe, the holiday season is upon us and everyone is looking for quick and easy recipes and projects to do. For this holiday season my gift to you is my "12 days of great recipes and easy craft projects" to hopefully help make everyone's holiday season a little tastier, easier and merrier! Everyone (even I) could use some great tips, recipes and easy projects to get them through the hussle and bussle of the holiday season. Whether you work outside the home, volunteer or have friends and family coming by you need to have some tasty, quick and easy cookie recipes that you can whip up with little stress or effort. Here's one that fits the bill for all of the above!
My Raspberry Cookie Bars are just the ticket for easy holiday entertaining, cookie exchanges or the office potluck. They check off all the boxes, they're pretty, they're tasty, low cost AND easy! What more could you want at this busy time of year?

To make these awesome cookie bars you will need:
1 large and 1/2 of a small tube of Sugar Cookie Dough - or you could make you own from scratch
1 to 1 1/4 cups of Raspberry Preserves or Jam (or your favorite flavor)
1/2 to 3/4 cup sliced Almonds
1/2 cup Chocolate chips or melting wafers and/or 1/2 cup White Chocolate chips or melting wafers
Shortening (I use Crisco)
1 deep sided cookie/baking sheet lined with foil that extends over the ends a few inches
Non-stick Baking spray
 To prepare -- pre-heat oven to 350 degrees F, line cookie sheet with foil and spray with non-stick baking spray.
Open the large tube of dough and press out over foil lined and sprayed cookie sheet. ** it helps to dip your fingers in a little flour to keep them from sticking to the dough.


Stir up Preserves or jam too loosen any clumps and make it easier to spread, with the back of a spoon spread over the prepared cookie dough.

Next sprinkle the sliced Almonds over the preserves,
 now using the 1/2 of the small tube of cookie dough, drop small bits of dough over preserve and Almond layers, making sure to leave open areas of the preserves showing. *** again I do find it easier to do this when I dip my finger tips in a little flour as the dough tends to be a little sticky.
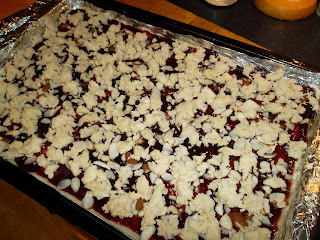
Bake at 350 degrees for about 40 minutes or until top bits of dough and edges are lightly browned. Let cool completely.
 Now you could cut them up and serve them at this point or you could go
just a little farther and really make them decadent. I like to melt
some chocolate chips in the microwave, 1 minute first, stir and 30
second intervals - stirring after each until melted, adding about 1
teaspoon Crisco or your favorite shortening (do not use butter) and
stirring it into the chocolate to thin it so you can then drizzle it
over the cooled bars. Using a spoon scoop up some chocolate and hold it
over the pan of cooled bars and with a zig zagging
motion drizzle the thinned chocolate over the bars, keep repeating with
spoonfuls of chocolate until desired coverage is complete. You can do
all chocolate, all white chocolate - as I did below, or a combo of both -
which is really decadent looking.
Now you could cut them up and serve them at this point or you could go
just a little farther and really make them decadent. I like to melt
some chocolate chips in the microwave, 1 minute first, stir and 30
second intervals - stirring after each until melted, adding about 1
teaspoon Crisco or your favorite shortening (do not use butter) and
stirring it into the chocolate to thin it so you can then drizzle it
over the cooled bars. Using a spoon scoop up some chocolate and hold it
over the pan of cooled bars and with a zig zagging
motion drizzle the thinned chocolate over the bars, keep repeating with
spoonfuls of chocolate until desired coverage is complete. You can do
all chocolate, all white chocolate - as I did below, or a combo of both -
which is really decadent looking.

After you've drizzled your bars, let the chocolate cool and harden. BUT WAIT - (I feel like an info commercial, lol) don't throw out that extra chocolate. Pour it out onto a piece of wax paper, let it harden and then put in a zipper bag or airtight container and save it for the next time you need a little decadent chocolate drizzle. You could also chop it up and use it in chocolate chip cookies or another recipe like a bark -- shhh I may be posting some easy to make bark recipes later.

Then by pulling up the extended ends of the foil, lift the bars from the pan and place on a cutting board or surface.
 I always trim about 1/2 an inch of the edge away from the bars and then cut into squares, diamonds or wedges. I think it gives a prettier presentation and I get what I call the cooks portion to nibble on, my daughter says that's the best part.
 Over the next few weeks I will be posting some of my and my family's
favorite quick and easy recipes and craft/decorating projects. I hope
you all will try them and please let me know what you thought of the
recipe or craft project. Cooking and crafting are my passions and
getting to share them with others is just an additional joy to me. I really hope you try these delicious and easy cookie bars and let me know how they turned out for you! Happy Holidays to all!
Over the next few weeks I will be posting some of my and my family's
favorite quick and easy recipes and craft/decorating projects. I hope
you all will try them and please let me know what you thought of the
recipe or craft project. Cooking and crafting are my passions and
getting to share them with others is just an additional joy to me. I really hope you try these delicious and easy cookie bars and let me know how they turned out for you! Happy Holidays to all!
My Raspberry Cookie Bars are just the ticket for easy holiday entertaining, cookie exchanges or the office potluck. They check off all the boxes, they're pretty, they're tasty, low cost AND easy! What more could you want at this busy time of year?

To make these awesome cookie bars you will need:
1 large and 1/2 of a small tube of Sugar Cookie Dough - or you could make you own from scratch
1 to 1 1/4 cups of Raspberry Preserves or Jam (or your favorite flavor)
1/2 to 3/4 cup sliced Almonds
1/2 cup Chocolate chips or melting wafers and/or 1/2 cup White Chocolate chips or melting wafers
Shortening (I use Crisco)
1 deep sided cookie/baking sheet lined with foil that extends over the ends a few inches
Non-stick Baking spray

Open the large tube of dough and press out over foil lined and sprayed cookie sheet. ** it helps to dip your fingers in a little flour to keep them from sticking to the dough.


Next sprinkle the sliced Almonds over the preserves,


Bake at 350 degrees for about 40 minutes or until top bits of dough and edges are lightly browned. Let cool completely.


After you've drizzled your bars, let the chocolate cool and harden. BUT WAIT - (I feel like an info commercial, lol) don't throw out that extra chocolate. Pour it out onto a piece of wax paper, let it harden and then put in a zipper bag or airtight container and save it for the next time you need a little decadent chocolate drizzle. You could also chop it up and use it in chocolate chip cookies or another recipe like a bark -- shhh I may be posting some easy to make bark recipes later.

Then by pulling up the extended ends of the foil, lift the bars from the pan and place on a cutting board or surface.


Subscribe to:
Comments (Atom)