Ocean Shores, WA

Ocean Shores, WA
my favorite place

Thursday, September 13, 2012

Cream Puffs with Raspberry and Lemon Mouse

Prior to the family Potluck I asked for suggestions on FB as to what to make - I was brain dead and nothing sounded good.  One of the items brought up in discussion was Cream Puffs.  This sounded good, they're fairly easy and relatively inexpensive to make.  We have a lot of diabetics in our family so I thought I would try to make them as "diet" friendly as possibly.  Nothing worse than delicious looking desserts and you know you can't have it because of the sugars or fats.
These Cream Puff's were so light and airy and DELICIOUS!

For the Cream Puffs I used the recipe from my old "trusty" but certainly not "dusty" Better Homes and Gardens cookbook that I've had since I was 18 - no don't bother doing the math! Just know that I've had it for awhile and let's leave it at that! It's a quick and very simple recipe of 1 C water, 1/2 C (1 stick) butter or margarine, 1 C flour, 1/4 tsp salt and 4 eggs, comes together very quickly and is very versatile in it's uses for shaping the dough.  In fact I've already thought of some ideas using this dough to create some festive looking desserts for the holidays.
 In a medium sauce pan (I use my non-stick 2 quarter) melt the Butter or Marg., add the water and bring to a boil.     
   
Add the Flour and Salt all at once and STIR VIGOROUSLY! -- hardest part of the whole recipe!!!
continue cooking and stirring until the mixture is all combined and forms a nice ball that doesn't separate. Add Eggs 1 at a time, using a wooden spoon mix well after each one for about 1 or 2 minutes until smooth.
  
You can drop the batter by teaspoonfuls onto a greased baking sheet or put the batter in a large decorator or pastry bag or a gallon sized zippered freezer bag.  **HINT, don't use a regular storage bag - they will blow out on you, they're just not strong enough for this kind of batter.  Squeeze all the air out you can before closing the bag, snip about a 1 inch cut off a bottom corner and "pipe" the batter onto the cookie sheet.  The size and shape is up to you, I like to do about a doughnut hole size of batter.  I prefer to make desserts like this in about a 2 or 3 max bite size for parties and potlucks, that way you don't feel so guilty having several different things when they're only a few bites each.  I also think it would be really pretty to fit your bag with a large STAR decorator tip to pipe the batter out, just would give a little fancier look to them. Thinking I'll try this next time I make them.
  
 If there are any little "peaks" of dough or they are not as rounded as you would like, just dip your finger in a little water and pat the dough into shape.
  
Bake in a pre-heated 400 degree oven for about 20 to 25 minutes, longer if making larger shapes.  Just watch the first batch close so you'll be able to do the next with ease.
 
 After baking, remove to parchment paper and let cool.  When completely cool, carefully pull off a little top or cap and set aside, if there's extra dough, just pinch it out. Generally these come out very airy with a nice little cavity to hold the filling, but sometimes there is more dough than I want, so I just pinch it out.  

On to the filling! In my efforts to keep the sugars and fats down, I decided to use the basic 2 pt pie recipe idea I like from Weight Watchers as the base and then just kick it up a bit!  For each filling I used 4 ozs of softened "light" Cream Cheese, 1ea .3 oz pkg Sugar Free Jello (1 in Raspberry and 1 in Lemon), 4 T Whipping Cream and 1 8oz thawed Lite Whipped Topping (I used store brand - works just fine).  For the Raspberry flavored Mouse I also added about 1/4 cup Raspberry Jam that I stirred up to loosen a bit first, it just adds a little more flavor and texture.  For the Lemon Mouse I added about 1/2 of a Lemon's Zest - really kicked up the flavor, plus the lemon I had were very fragrant.
 Place the 4 oz of Softened Cream Cheese in your mixer bowl - whats great about this recipe is that from 1 - 8 oz brick of cream cheese you can get 2 different flavored fillings.
 Whip the Cream Cheese till light and smooth, add the Whipping Cream and continue whipping for about 3 minutes - will fluff up a little bit and add some volume.
 While the Cream Cheese mixture is whipping combine 1/4 C Boiling Water to the .3 oz package of Jello, stirring until all the Jello is dissolved.
 With the mixer on LOW speed start pouring in the Jello, use a spoon to get it all out from the bowl, continue mixing until combined well, making sure to use a spatula to scrape down the sides and bottom.
 Add your freshly zested Lemon Zest or Jam if doing the Raspberry flavor Mouse, mix it in well.
 Almost done, next use a spatula or wooden spoon FOLD in your thawed 8 oz container of Whipped Topping.
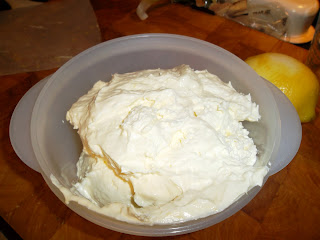
 Look at how light and fluffy the filling is! If you want a more intense color add a few drops of food coloring before you fold in the Whipped Topping.  Between the Cream Cheese and the Whipped Topping the color of the Jello lightens up considerably.
 Fill a pastry bag or gallon sized zippered freezer bag and pipe in the filling into each little Puff, filling just a little above the rim of the Puff.
                                                 Put their little tops back on.......................
After all the Cream Puffs were filled I drizzled them with some Chocolate Sauce I made from melting some Semi-sweet chocolate wafers (can use chips too) in a little bit of the warmed Whipping Cream, stirring till all were melted and mixture was smooth.  **HINT, the sauce was good but next time (which is how I usually do it) I will just melt some chocolate and thin it with some Shortening and use it for the drizzle.  I like how it "sets" back up or hardens better.  It's not as messy to eat and I think the shiny threads of chocolate are so pretty and very decadent looking. Then just refrigerate until ready to serve.

I hope you enjoy this dessert as much as my family and I did.

My new CREATION --- Greek Onion Bread

A couple of weeks ago we had a family potluck BBQ as a going away party for my Uncle Tom and his wife Paula.  They're moving down to Texas for a few months, then off to Montana to be camp host.A fun and exciting time for them as while in Texas they'll get to spend time with Tom's kids Kara and Tom and their kids.

I had a hard time deciding what to take for the potluck, I knew my brother was BBQing chicken and ribs and I knew what my Mom was taking - but that was everyone else bringing???  Our group that gets together is getting smaller and smaller as the years go by, kids grow up and move away, time and date conflictions - you know all of that stuff.  It's always a guess as to what dishes will be there, so I try to kind of "bridge" any gaps and usually end up taking several things - as I did this time as well. I feel bad for the ones that don't make it to the party, cause it's always a fun visit with everyone and the food is awesome - we have some wonderful cooks in our family.

In taking stock of what I had on hand, what was in the budget and thinking about how creative did I really want to get, I had to figure this epicurean adventure out!  I had watched an episode of Paula Deen where she made a Vidalia Onion Pie - it looked delicious, but I didn't have some of her ingredients.  I knew I had 2 balls of pizza dough in the freezer, I had yellow onions and I had some Feta cheese, ah ha, I would make a Greek Onion Bread as an Appetizer.
                                         
My "Greek Onion Bread" turned out so good, everybody really liked it and it was good at room temp too! Perfect for a party or gathering.
 Like I said I had 2 balls of pizza dough in the freezer.  I took them out the morning before and put them in the fridge to start thawing.  The next morning when I got up, I put the balls in bowls that I had lightly sprayed with olive oil, turned them to coat and covered with plastic wrap and set them aside to rise.
 After the dough had risen, I pushed it out onto a lightly Olive Oil greased baking sheet and set it aside.
 I sliced up 2 yellow onions (Vidalia's or any sweet would work great too) and chopped 5 cloves of garlic (they were small).
 I put about 3 T of Olive oil into a large sauce pan - a fry pan and saute the onion would work to (I just need lots of room for stirring), on med to med-hi heat.
 Once the onions begin to look translucent add the chopped garlic and continue cooking for about 5 minutes more.  I then added 2 T of sugar and some salt and pepper to taste. I continued cooking and stirring for another 5 to 8 minutes.  You could cook longer and get a more caramelized onion - which would be delicious too! -- I was impatient.
 I sprinkled the dough with about 1.5 tsps of a dried Greek Seasoning I had - thought it would go nice with the Feta cheese.  Once the Onions were cooked to my liking I spread the mixture evenly over the dough.
 
 I wanted to add some color to my bread creation, so I chopped up a handful of fresh Spinach, fresh Basil would be awesome as well.
 and sprinkled that over the dough.  The Spinach added some nice color and some good nutrition!
 Next came the Feta Cheese, yummm, we love Feta! I had a package of crumbled, but it you have the solid brick just break it up or grate it into smaller pieces.  I actually broke up some of the bigger pieces to get more coverage.  feta doesn't really melt so I like to make sure I have it as spread out as possible. As this is Greek Onion Bread, I grated some fresh Lemon Zest and sprinkled it over the top to give it some additional tang and freshness or "brightness" as all the TV chefs say! LOL
 I then baked my Greek Onion Bread in a pre-heated 425 degree oven for about 15 minutes. **Hint, just keep checking for doneness, the sides will brown up faster than the middle will cook.
Viola! The finished product, cut up into about 3 to 4 in squares, just the right size for an appetizer.


Tuesday, September 11, 2012

Time for an old fashioned Fried Chicken Dinner!

I don't know why making a fried chicken dinner is reserved for Sundays, I guess because of the time it takes?  In my effort to loose some fat from my diet I don't make it often anymore or much of any fried foods, much to my families dismay.  As tasty as fried foods are, I just don't need the extra calories and fat. So I save these tasty treats for cravings I just can't say no too!

That's what happened a week ago, the craving for some good old fried chicken forced itself upon me, I think I may have been watching Paula Deen when this craving hit!  I had a whole chicken in the freezer, so I took it out the night before and started the defrosting process, step one done!  Now what else do I make to go with the chicken. Well with fried chicken you (at least I do) have to have mashed potato's and milk gravy, that takes care of the starch of the meal.  Now what about a vegetable?  Feeling a little nostalgic I decided to get some fresh green beans and make them the way my Grampa Dill taught me too. I have some tasty watermelon in the fridge so I think some nice cool slices of it  will serve as the salad - nice and lite and cool on a warm summer night.

With my chicken completely defrosted, I remove it from it's packaging, remove all that "stuff" inside the cavity and gave it a good rinse.  I had it cut into pieces before I realized that maybe I should have taken pics of that process because I really don't think that many people know how to do this step anymore. Oh well there's always a next time. OK on to the process of frying up some chicken!  After the chicken's rinsed and cut up, I lay it out on my cutting board and season it up on the skin side with some salt, black pepper, onion and garlic powder. 
In a shallow bowl I mix up about 1 cup of Flour, 1 T Garlic Powder, 1 tsp Salt, 1/2 tsp Black Pepper, and 1/2 tsp Paprika, mix these all together well. I then coat the chicken in this flour mixture, place it on a cooking sheet and let it rest. 
While the chicken rest I get my frying oil ready.  In a large deep sided frying pan I place a mix of shortening and canola oil to make enough frying oil about 1 inch deep in the pan.  Once the oil is ready to fry in - about 350 degrees, I dip the chicken back into the flour mixture, shaking off any excess and "carefully" place it in the hot frying oil, being careful not to over crowd the pan -- reserving the flour mixture. I generally fry on each side for about 5 minutes depending on the thickness of the piece.
When the chicken is cooked I place it in an oven-proof dish and place it in the oven that's been set on the lowest temp to stay warm.

The next best thing about a Fried Chicken Dinner is mashed potato's and milk gravy!  I won't bore you with explaining how to make mashed potato's, if you need instructions let me know and I'll be happy to share my knowledge! But the MILK GRAVY is what I want to talk about!!!! This has got to be one of the best things I ever learned to make and is such a memory from my childhood.  To make this delicious gravy you need to do just a few simple steps.  After removing the last piece of chicken, turn the burner off, let the oil cool down slightly, carefully pour all but about 3 or 4 T of the oil out of the pan - leaving those tasty crispies in the pan, I have a heat proof can I use to collect my "fry" oil or do whatever you want with it. DON'T pour it down your sink - bad for the drain and pipes.  Return the pan to the burner and turn the heat up to med-hi, add the remaining seasoned flour mixture reserved from coating the chicken. 
Stir the flour into the oil. scraping the tasty bits from the bottom of the pan - these little cooked bits and pieces are pure flavor! Add 1 T of butter (yes I know), continue stirring this mixture and cooking the "raw" flavor out of the flour.  The butter just adds a great flavor and a silkiness to the texture.
After cooking for a few minutes slowly start pouring in milk about 1 cup at a time, stirring after each addition until you have the thickness you desire.  I like my gravy thick, so I probably only add about 3 cups of milk, no I don't measure the amount of milk, it's all by look and texture.  Once I have the consistency that I want, I taste for seasoning.  Since the flour already had seasonings in it I usually just add a little more Salt and Pepper.
A great side dish for this is fresh green beans and ONLY my Grampa Dill's recipe will do!  I start these before I the chicken so the beans have time to cook.  I hand picked fresh green beans at the grocery store, snapped the ends off and rinsed them well.
As per my Grampa Dill's instructions when I was about 8, in a 2 quart sauce pan, place about 2 or 3 T bacon grease (yep) about 1/4 cup chopped  onion, cook for a few minutes until the onion starts to become transparent. "I" at this point add 2 cloves of finely minced garlic, cook for a few more minutes.  Next add about 2 slices of bacon (yep yep) sliced in thin pieces, cook till almost done, but not crispy. 
Add the cleaned and rinsed green beans, toss the beans around in the onion, garlic and bacon mixture, add just enough water to just cover the beans.  Sprinkle with a touch of salt and some black pepper, cover and set the heat on simmer and let the beans cook.
Now get those Tater's mashed, beans drained and a plate on the table, it's time for some Sunday Fried Chicken Dinner!  Dang now I'm craving fried chicken again.